
As there are many different disciplines, riding styles, and equitation habits, there are many ways of starting a horse. Whether you call it breaking a horse, colt-starting, or basic training of a green horse, we all do it in pursuit of developing a deeper relationship with our four-legged friends.
Considering the many techniques, there is no “one right way” to train a horse, for it is a process that depends on the horse, the trainer, and the situation; three variables that dramatically change between each circumstance. Keeping this in mind, it is useful to be able to understand the methods of the many in order to best create a training program that is most applicable to you and your horse.
Having grown up in western horsemanship, I am most familiar with the use of a rope halter for starting a young or green horse; a tool of which I swear by to this day. So, in the name of broadening the equine community’s knowledge, let’s take a deeper look into the process of using a rope halter for starting your horse. As you read this particular article, I am in no way claiming the superiority of this method over others, instead simply offering insight into another technique that has proven beneficial in past experiences from one equestrian to another.
Why Use a Rope Halter?
You may be asking yourself; what is so special about a couple pieces of rope and how can this possibly help me train my green horse?
Well, these few pieces of rope have more to them than meets the eye. Considering that they are made from the simple material of rope, which can be found at nearly any hardware store, this halter is constructed in a way specifically designed for the training process.
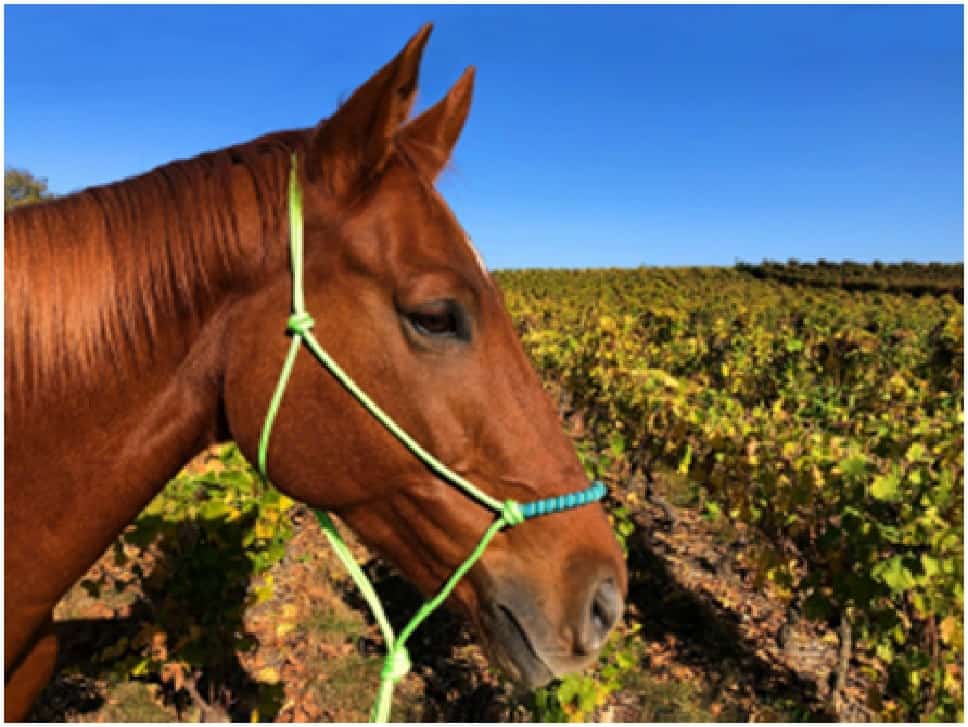
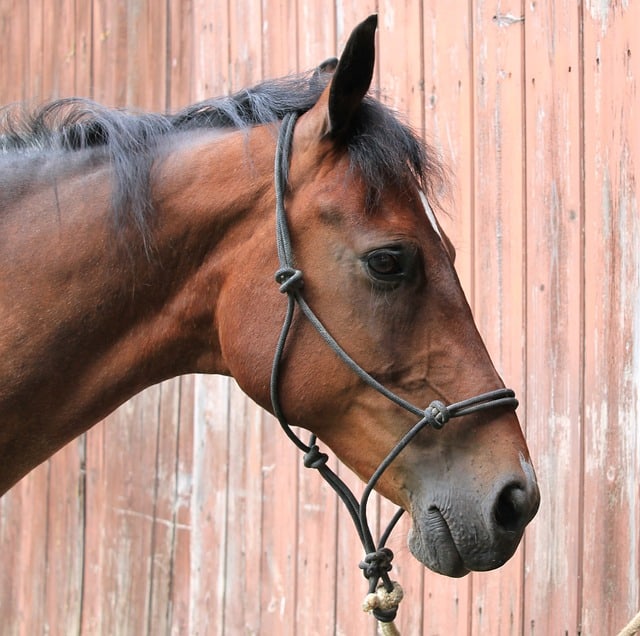
Each rope halter is built with several knotted points disbursed across the headpiece, which will rest on your horse’s cheeks and temples once the halter is put on. These knots act as pressure points on your horse’s head during the training process, allowing you to concentrate your pressure on a particular area. This allows for the pressure, or asked task, to be intensified to that smaller area, soliciting a quicker response from your horse.
Horses learn based on the principle of pressure added followed by a feeling of release, which they then associate as the desired outcome. The knots allow for there to be a clearer message of “I want you to move away from this pressure point,” making this process follow a pattern of being simple, direct, and quick.
Once a horse gives in to that particular pressure of the knot, the halter is designed to provide a release, making it easier for your horse to associate release with the task that you requested. While the halter does provide a slight release, be sure to always release your hand pressure to further their understanding of the task at hand.
How To Use a Rope Halter
In order to get the most out of your rope halter, it is crucial that you put it on correctly. Before going up to your horse, make sure that your lead line is organized and out of your way without being wrapped around your arm. Once you are positioned safely next to your horse and ready to put their halter on, make sure that you are on the left side of their head; this is where the application knot needs to be tied.
In the equine community, it is common to see riders place their lead lines over their horse’s necks before the halter for additional securement, but when using a rope halter, this process is of minimal convenience. Rope halters have a piece that overlaps the top of the horse’s head and behind their ears, called the crown piece, which does the same thing as a lead line around the neck.
In your right hand hold the crownpiece and in the left hand the looped portion of the halter where the crownpiece will be tied. On the nose portion of the halter, there are two knots designed to sit on each side of your horse’s nose when worn, a fact that can be used as a reference point when putting your halter on.
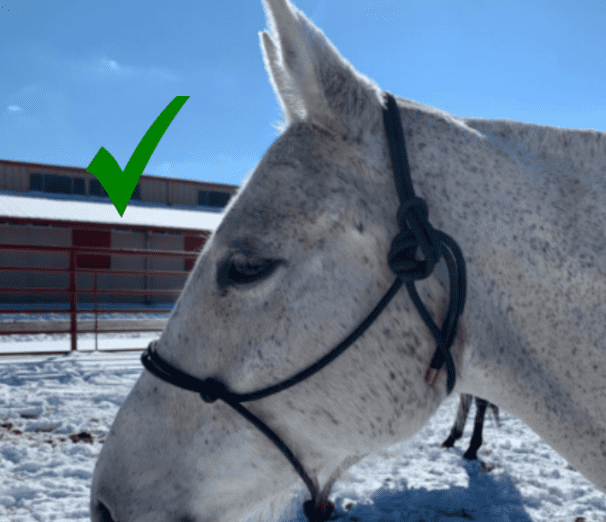
Carefully placing your right hand over your horse’s head, and behind their ears, gently pull your halter up their face so that the nose piece is situated correctly over their nose. Then pull the crownpiece over their head, behind their ears to meet up with the loop in your left hand, where you will make your final securement knot. Vertically feed the crownpiece through the loop, then coming from tail to head, place the rope underneath the halter then back through the additional loop you just made.
Your completed knot’s excess rope should always be facing towards the tail to avoid the rope making any contact with your horse’s eye during training. For a visual representation, check out the our video below;
Getting Started
Much of the training that goes into creating the perfect horse-to-human relationship remains the same for each person, and the inclusion of a rope halter is no exception. Training is all about how you as a rider build a working relationship with your horse, which changes depending on the type of discipline you participate in. So while your more general training habits won’t change with the addition of a rope halter, there are a few things to remember that can make or break your process.

When working with a young or green horse, who has maybe never even seen a halter before, you want that horse to be able to look forward to that halter being put on. This is where the habit of hiding the halter in the pasture needs to be abandoned. Just because that rope halter is behind your back, does not mean that your horse doesn’t know it’s there, trust me they know. This situation is stressful for both parties involved, as your horse has a sense that something else, maybe something scarier is coming and you are in a way lying to them, making both you and the horse more anxious about what’s going to happen next. Instead, be honest and upfront with your horse by showing them what’s to come, and if they do come and patiently await the halter, this is now the reward instead of the “surprise, you are caught.” Using this method, your horse is more likely to associate positive reinforcement with the rope halter.
Once your horse is caught and ready for the practice pen, you can begin putting those knots to good use. As mentioned earlier, those knots are designed to help develop a more concentrated pressure and release relationship, so that your horse can more effectively associate the release with your intended tasks. If you have access to a round pen, this is an additional tool that can help to further focus your training techniques but is not necessary.
Think of your rope halter as the bridge that connects you and your horse, with the idea that if they trust you, they will trust your chosen equipment. The primary idea of the rope is to gain control of your horse’s head, and wherever the head goes, the feet will follow.
You can practice this by sending your horse out in a round pen or lunging circle, then seeing how easily you can bring them back to you. When you first begin this process, you will have to use more pressure on those outside knots, but as you practice more and more your horse will begin to understand that if they turn quickly to you, that pressure will disappear even quicker. Think of this as the “sweet spot,” or a point of mutual relaxation where you and your horse can always return to if things get too complicated.
Once you feel more comfortable here, begin incorporating more body parts, such as the hind and forequarters to gain better control of your horse’s directions. The idea here is to able to engage and disengage their hind and forequarters using your rope halter. To do so, once again send your horse out on the circle, but instead of meeting at the “sweet spot,” right away, you are going to continue to send them in the opposite direction, making their turn more precise. Using your lead line, you are going to pull it back toward their shoulders, which will stop their feet while asking them to plant their forequarters and engage their shoulder. Then push their hindquarters away from you while keeping their shoulders planted to disengage the back feet away from your pressure. Once they are completely facing you, you are going to complete the same process but to the shoulders, as the hindquarters stay planted. This process helps to isolate your horse’s movements so that you can better influence how and when they turn in the future.
These kinds of movements can happen fast at times, making the rope halter your best friend who is able to apply your intended pressure exactly where it is required. These simple yet effective exercises build a solid base ground for your horse, and as you both advance you can apply these movements in every task, eventually building up to the perfect working horse.
Some Points to Consider.
The rope halter is much different from a nylon or leather halter, and as result needs to be used with care. The use of a rope halter is best paired with a cautious and soft hand due to the fact that too much pressure can actually inflict pain on the horse in training.
The knots, while useful, can become dangerous if the trainer uses too much force when asking a task. Instead, these knots are designed to step in as additional pressure so that you do not have to work as hard, so it is important to let the knots do their job when using this halter. To get a better feel of how the pressure points work, you can try to place them on yourself prior to your horse. Here, you can feel out how little pressure it takes to feel the knots so that you can better apply this ideal of soft pressure in the training pen.
Rope halters are just one of the many tools used in the world of horse-training, complete with their very own advantages and disadvantages, it simply depends on your preferences. But when we take a step back, using a rope halter can help to better build the bridge of communication between you and your horse, all while not breaking the bank.
This Article by Jordan Bastian was originally published in the April 2021 Issue of Irish Sport Horse Magazine.